“Bed Peds”
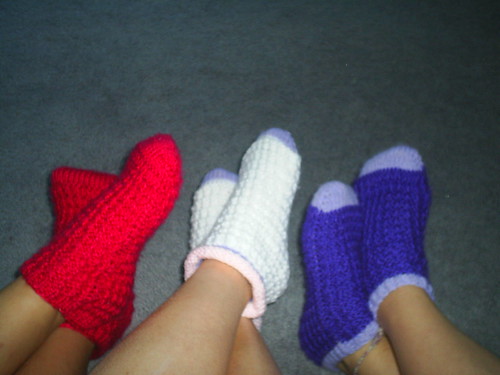
You can make a pair of these in a couple of evenings. They’re great for wearing to bed on a cold night, and there are no heels to fuss with. They make great gifts for just about anyone. You can make an everyday or kid-friendly version with a washable yarn or yarn blend. You can think about making a special, lavish pair with cashmere for someone special, too! Use up the oddments in your stash to make the cuffs and/or toes different colors. Let your imagination be your guide. These are intended to fit in a more "slouchy" way than socks. This pattern is offered in two versions: worked flat or worked in the round!
Difficulty Level: Intermediate
Size: Women’s S (5-6), M (7-8), L (9-10)
Directions written for size small. Instructions for larger sizes are in parentheses. If using different colors for cuffs and/or toes, change colors at row six and at beginning of toe shaping.
Materials: Worsted weight yarn, total 185 yards of the color(s) of your choice
Knitting needles sizes 5 and 7
Tapestry needle
1 stitch marker (2 stitch markers for circular version, in two different colors)
Gauge: On larger needles, 18 st and 24 rows = 4 inches in stockinette stitch.
***NOTE!! Photo shows one version with an optional rolled cuff. See notes in flat and circular versions regarding this.
Abbreviations: SSK (slip one stitch as if to knit; slip next stitch as if to purl; insert tip of left needle through front of both stitches and knit together)
Note: Slip the first stitch of every row as if to purl. This will result in an edge of easily visible V-shaped chain stitches.
_____________________________________________________________________
***Optional Rolled Cuff: With larger needles, cast on 44(46, 48) stitches.
Row 1: Slip 1, K across.
Row 2: Slip 1, P across.
Rows 3-6: Repeat rows 1 and 2 twice more.
Row 7: Repeat row 1.
Change to smaller needles for ribbed portion of cuff (rows 1-5 below)
_____________________________________________________________________
FLAT VERSION (make two)
With smaller needles, cast on 44 (46, 48) stitches (or begin with optional rolled cuff as above).
Row 1-5: Slip 1, *K1, P1* across. End K1. ***Note: If you made the optional rolled cuff and are now changing colors to make the ribbed portion of the cuff, round 1 is to be knit only. Continue with rounds 2-5 in K1, P1 ribbing. This is to avoid seeing the two colors in the transition row.
Change to larger needles.
Row 6 (RS): Slip 1, K across.
Row 7: Slip 1, K across.
Row 8: Slip 1. *K1, P1* across. End K1.
Row 9: Repeat row 8.
Repeat rows 6-9 11 (13, 15) times. Repeat Rows 6 and 7 once, placing marker after stitch 22(23, 24).
Toe Shaping
Row 1 (RS): SSK. K to 2 stitches before marker, K 2 tog. Slip marker. SSK. K across to last 2 stitches. K 2 tog.
Row 2: Slip 1, purl to last stitch, slip last stitch.
Rows 3-6: Repeat rows 1 and 2 two more times.
Row 7: Repeat row 1.
Row 8: Slip 1. Purl to marker. Remove marker. Leave remaining stitches unworked.
Finishing
Fold in half with wrong sides together. Cut yarn, leaving a long tail. Graft toe stitches using
--------------------------------------------------------------------------------------------------------------------------------------------------------------------------------------------------
Circular Version (make two)
Note: The particular method for working in the round (double-pointed needles; two circular needles; magic loop method) is not given. This is left to your discretion/preference. Note that because there are no seams, there are 2 fewer stitches in this version (no selvedge).
_____________________________________________________________________
***Optional Rolled Cuff: With larger needles, cast on 42 (44, 46) stitches.
Rounds 1-7: Knit.
Change to smaller needles for ribbed portion of cuff (rounds 1-5 below)
_____________________________________________________________________
With smaller needles, cast on 42 (44, 46) stitches. Place marker and join for circular knitting (or begin with optional rolled cuff as above).
Rounds 1-5: K1, P1 around. ***Note: If you made the optional rolled cuff and are now changing colors to make the ribbed portion of the cuff, round 1 is to be knit only. Continue with rounds 2-5 in K1, P1 ribbing. This is to avoid seeing the two colors in the transition row.
Change to larger needles.
Round 6: Knit.
Round 7: Purl.
Round 8: K1, P1 around.
Round 9: Repeat round 8.
Round 10: Purl.
Round 11: Knit.
Repeat rounds 8-11, 11 (13, 15) times, placing marker after stitch 21 (22, 23).
Toe Shaping
Round 1 : SSK. K to 2 stitches before marker, K 2 tog. Slip marker. SSK. K across to last 2 stitches. K 2 tog.
Round 2: Purl, slipping markers.
Rounds 3-8: Repeat rounds 1 and 2 three more times. Leave remaining stitches unworked, with half of the stitches on each of two double-pointed needles.
Finishing
Using markers as a guide for indicating sides, graft toe stitches using
Note: Though only women’s sizes are given here, you can easily adapt this pattern for babies, smaller children and even men. For much smaller bed peds, cast on a fewer number of stitches; any even number that will result in the measurement you need in your gauge. Repeat the main body (the rows between the cuff and toe shaping) for fewer repeats. For men, cast on more stitches; any even number that will result in the measurement you need in your gauge, and work the main body for more repeats. Incidentally, this is a great pattern to use for thumbless mittens for babies, too! Just make a bed ped the size of the baby’s hand.
For longer bed socks, just make the section between the cuff and the toe shaping as long as desired (tube socks). Feel free to use your imagination. Make stripes. Hold a strand of mohair or eyelash yarn with your main yarn for fluffy bed peds, or make just the cuffs and/or toes furry. Have fun!
This pattern is offered for personal, non-commercial use only. Items made from this pattern may not be sold without the express written consent of the author.
This pattern and the text and photos contained within, may not be copied or reproduced for any purpose other than personal use. Copyright 2008 Yvonne Senecal.
Despite the fact that I have comments enabled, in order to comment you need to actually click on the title of this (or any other) post. Sorry!


4 comments:
Hi, love your patterns! Can you post a picture of the Bed Peds again? The photo seems to have disappeared!
Thank you for posting! They're awsome! I needed a new project. This may be it!!!
I just discovered this pattern! It’s great, but I think when done in the round the toe area should be decrease round, then knit round for the repeats. Makes a smooth stockinette toe, just as the flat directions state. Thank you, these are east and look great!
Clearly I am late at finding this website but love the pattern for "booties" or Bed Peds. Plan to put a pair on needles tonight.
Mary Kruhm
writer@marybk.com
Post a Comment